

Although we’ve passed the Winter Solstice in the Northern Hemisphere, it’s still chilly out here at NOD headquarters in Canada. While the days are short and the bees are tucked away in their clusters, now is the ideal time to start playing and experimenting with beeswax!
One of the things that caught my attention early on in my relationship with honey bees was the intoxicating aroma of beeswax. While attending the University of Guelph, I joined the Apiculture Club where we regularly made beeswax candles and lip balm. I was fascinated by the sweet smell of the melting wax and couldn’t believe it…this came from an insect?! Thus began my 15-year obsession with beeswax and added another layer onto my love of honey bees. I hope to share some of this love with you here.
Humans & Beeswax: Some History
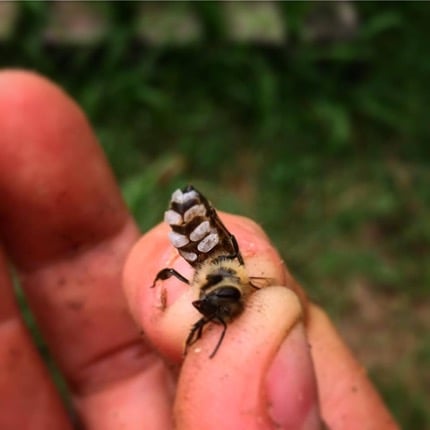
Figure 1: A worker bee producing beeswax with her wax glands.
In the hive, beeswax plays an essential role. Combs made of beeswax create the “foundation of the house” by providing the structure where food is stored, and young bees are reared–two absolutely crucial functions of a honey bee colony. Worker bees have four pairs of wax glands on the underside of their abdomen [see Figure 1] which produce beeswax, but it takes an incredible amount of energy to do so. According to Whitcombe (1946), it takes anywhere from 6.66 to 8.8 lbs of honey consumed to produce 1 lb of wax. So beeswax really is precious!
Beeswax is a miraculous and versatile substance that has been sought after throughout our long relationship with honey bees. Humans have had a connection with honey bees for thousands of years; at least since the end of the last ice age when Neolithic peoples started to engage in agriculture and pottery. The first evidence of our relationship with bees was found in present-day Turkey when pottery vessels with beeswax residue were unearthed. Fun fact: these vessels dated back to 7000 BCE and are the oldest pottery vessels ever found in Eurasia!
Throughout history, humans have found countless uses for beeswax, including candle-making, cosmetics, sealing wax, lubricant, waterproofing, wood polish, and various forms of art. Its flammability, malleability, and water-repelling qualities have made it a highly prized hive product. But how do beekeepers actually get their hands on beeswax? Read on to find out…
Wax Processing on a Small Scale
Beeswax comb comes in a spectrum of shades, and the colour depends on its age and use in the hive. When it is first produced by honey bees’ wax glands, it is a clear liquid that hardens to white. As the bees manipulate the wax into hexagonal comb and it comes into contact with more bees, it starts to darken. If the comb is used for food storage (i.e. honey and pollen), it tends to stay light in colour but can be stained yellow from pollen. If the queen starts to lay eggs in the comb, it will darken to brown over time as generations of developing larvae produce and then shed a cocoon inside the cell. During the beekeeping season, there are a few ways to harvest beeswax. Wax cappings that are scraped off during the honey extraction process are a wonderful source of light coloured wax (see Figures 2a & 2b).
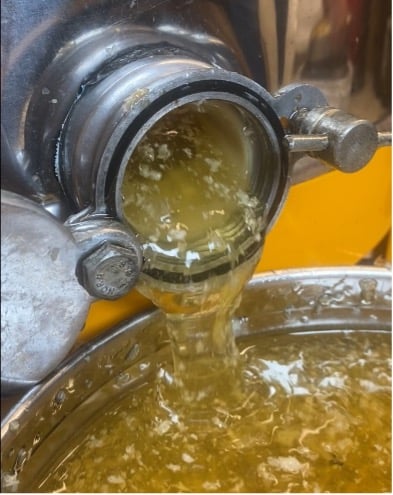
Figure 2a: Wax cappings are filtered out during the honey extraction process.
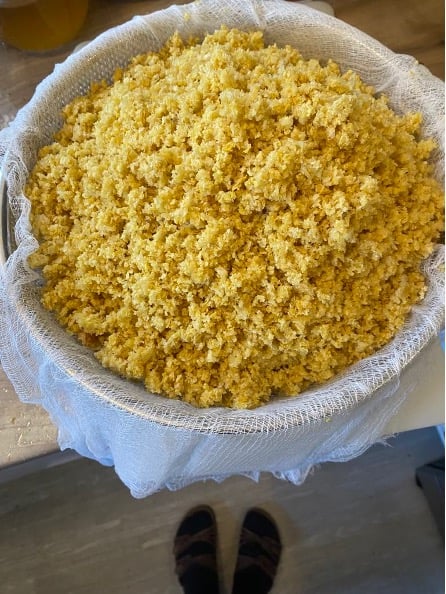
Figure 2b: Beeswax cappings after extraction
In the bee yard, I use a storage tote for scraping wax from frames or inner covers. I make an effort to keep light and dark wax scrapings separate, as darker wax requires more processing before use Last year I used a solar wax melter for the first time and I’m sold on it! The solar melter allowed us to extract beautiful blocks of yellow beeswax which were nearly ready for use with little effort. On sunny days, we loaded up the basin with wax scrapings, metal queen excluders, or any bits of wax we came across. The sun and gravity did the rest! I never have time to process and work with beeswax during the beekeeping season, but it is absolutely the ideal winter activity.
Here are my tips for processing beeswax at home:
- Beeswax should always be melted in a double boiler at a simmer (See Figure 3).
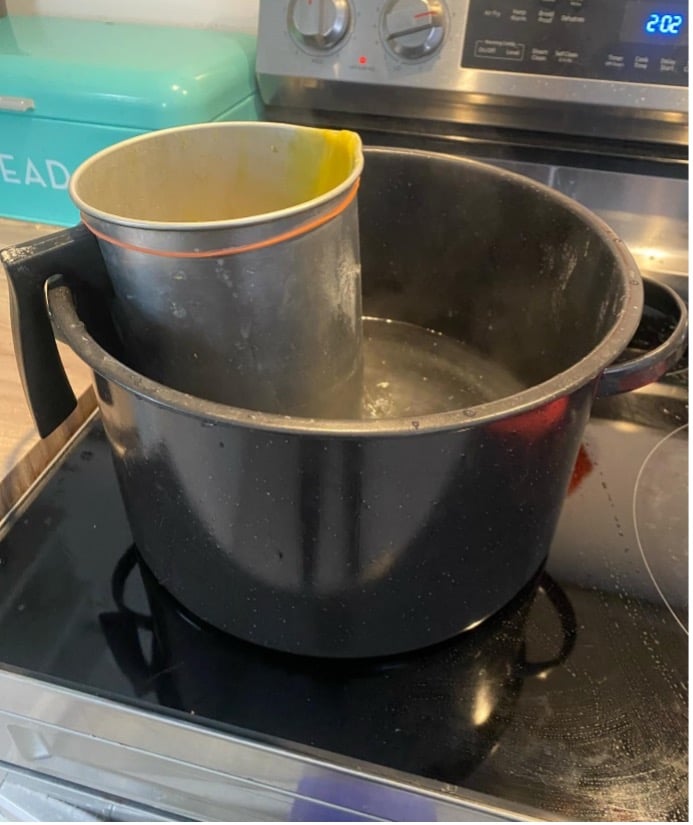
Figure 3: Beeswax melting in a double boiler.
Overheated beeswax leads to discolouration (and one time for me, melted plastic lip balm pots).
- There are specially made wax melters and other equipment available for wax processing, but I have always been a resourceful (i.e. cheap) crafty type! I love the thrift store for items such as pots for double boilers and silicone moulds for wax blocks etc. You can be creative; a muffin tin would work great! This way I can dedicate them to wax processing and not worry about getting wax on them–which you WILL do–without spending much money.
- It is often helpful to have multiple vessels for melting and filtering wax. Recycled metal cans, like those from coffee grounds or apple juice, can be useful for this! While I do find a wax melting can with a spout and a handle useful, I have managed fine for years without one.
- To filter out floating particles, I use plenty of cheesecloth–it is relatively inexpensive and easy to find! I fold over two or three times and secure to the top of my “clean wax” vessel with a large elastic band. Then, I slowly pour the melted, “dirty wax” through the cheesecloth.
- Be careful near the end of your pour, as the “slumgum” and other heavy particles will have settled to the bottom. I like to have a separate discard can to pour this waste into, allowing it to harden so I can wipe my melting vessel clean with a paper towel.
SLUMGUM: a beekeeper term for the debris that remains after wax processing. It is an amalgamation of the “leftovers” in your wax and can include propolis, bee parts, larval cocoons, and pollen.
Once you’ve got your wax cleaned and ready for use, what’s next? Arguably the most popular at-home use for beeswax is candle making. I have been making candles for over a decade and have learned a lot in the process. Part of the learning experience is making mistakes along the way, but there are definitely a few things that I wish I had known early on in my journey.
Candle-Making
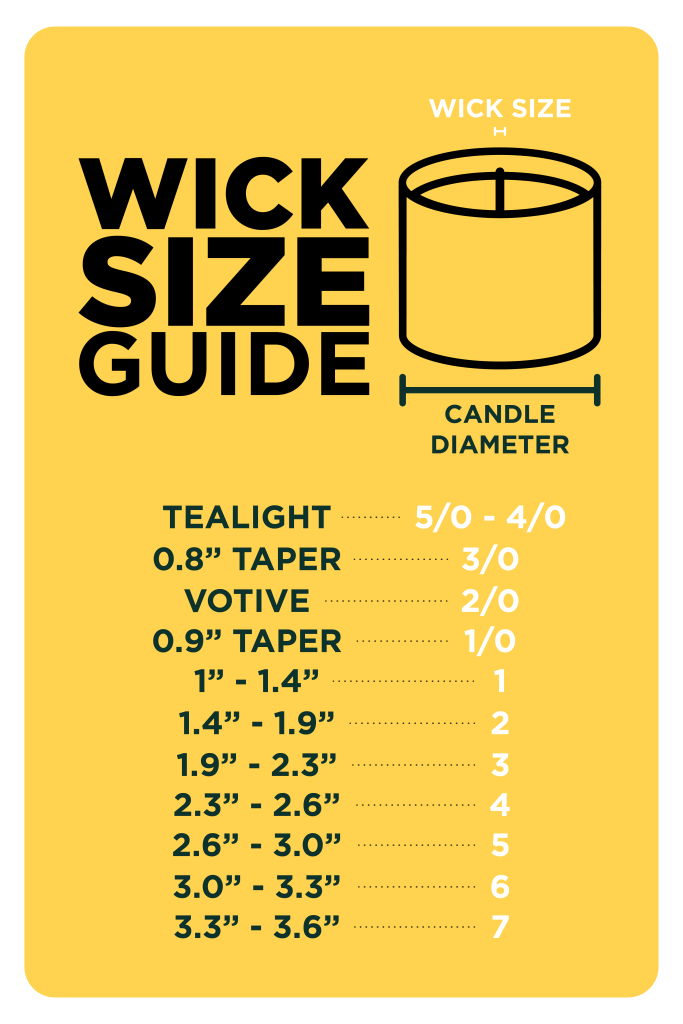
Figure 4: Beeswax candles wick size guide
Beeswax has the highest melting temperature of any conventional candle wax, which means it needs larger, more robust wicks for the candles to burn properly. Braided cotton wick comes in a range of sizes from 5/0 to #7 (from smallest to largest). The larger the diameter ofthe candle, the larger gauge of wick you’ll need (See Figure 4).
When it comes to making candles, there are a few ways to go about it! Here’s a quick overview of three popular methods for making beeswax candles:
Moulds Silicone candle moulds are an investment; they’re not cheap but they can be used for years. The necessary wick size is noted by the manufacturer, and a wicking needle is a great tool for threading the wick. Simply thread the wick into the wicking needle and insert it into the bottom of the mould, pulling through the top until you have a small amount poking out. To keep the wick taut and centered, I use a kitchen skewer balanced above the opening of the mould, with clothespins to keep it in place. Then, pour your melted and filtered wax into the mould just below the top.
Vessels Jars or other vessels can easily be turned into candles! Start by measuring the diameter and selecting the appropriate wick using the guide above. Secure the wick to the bottom of the vessel using a drop of melted beeswax, then suspend it taut in the centre using the method described above (under Moulds). Pour your melted and filtered wax into the vessel, filling it just below the top.
Dipping If you have patience and a lot of wax, you can fill a deep vessel that fits in your double boiler. Create a double length of wick to your desired candle length, plus 2 inches. Drape the wick over your index finger so the ends are even, then dip it in and out of the melted wax. Let the wax harden for a moment, and if necessary, adjust the wicks to keep them straight. Continue dipping, straightening, and allowing the wax to set, repeating the process until you have the desired size of candle. With my attention span, I can only manage to dip birthday candles (See Figure 5).
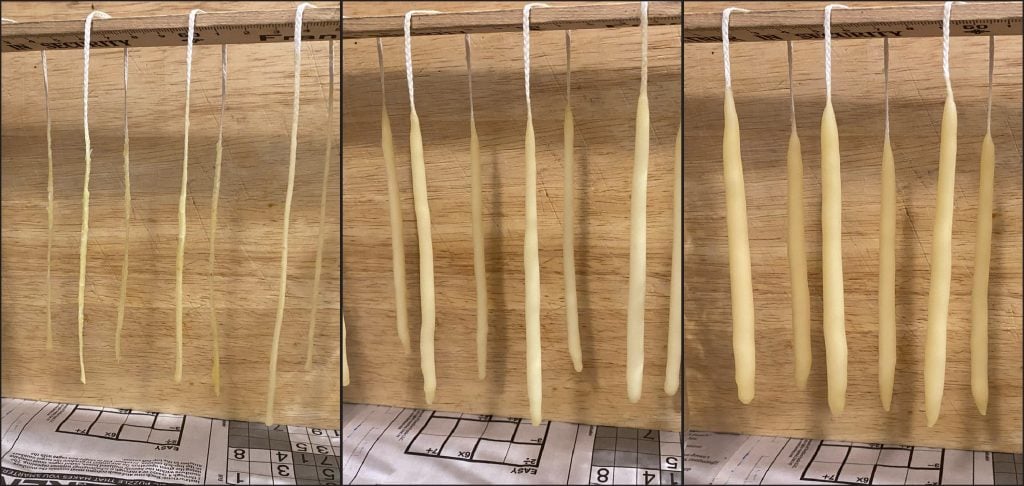
Figure 5: The levels of beeswax-dipped birthday candles (left to right) are one dip, two dips and three.
After candle making, homemade cosmetics are probably the most popular way to use beeswax. Beeswax is lipophilic, meaning that it readily combines with fats and oils. This makes it a great base for things like lip balms, salves, and more!
Beeswax Cosmetics
Owing to its ability to give the skin a protective barrier and help retain moisture, beeswax is a highly valued ingredient in cosmetics. By combining beeswax with carrier oils in various proportions, you can easily make a variety of basic cosmetics right in your kitchen! When melted and mixed with oils such as coconut, olive, grapeseed, or sweet almond (or a combination of them), you can make salves, balms, or body butters.
Basic Guidelines for Beeswax Cosmetics
- Use a new or dedicated melting vessel for cosmetics: Anything that touches your melted wax/oil mixture will be difficult to clean. (Pro Tip: Kitchen skewers also make great stirring tools for your cosmetic concoctions!)
- Melt your wax and warm your oil: Warming the oil beforehand helps prevent the wax from hardening too quickly, saving you from re-melting the mixture.
- Adjust the ratio: In general, more wax makes a harder balm, while more oil makes a smoother salve.
- Test consistency before packaging: Use your kitchen skewer to apply a drop to a piece of paper. Let it cool fully and press with your finger to test the texture.
- (Optional) Add essential oils: A few drops of essential oils can enhance your mixture with aromatic benefits! Just make sure they are safe for topical use before adding them.
During the dry days of winter, I am grateful to reach for my jar of beeswax hand salve. When I catch a whiff of sweet beeswax, I am reminded of summer days and the bees who helped make it possible!
Conclusion
 The days are still feeling short and cold up here, but experimenting with beeswax is a great way to feel connected to our honey bees in the depths of winter. For me, it brings me a sense of hope as I look toward the coming spring. I am forever grateful to the bees, who continue to inspire us and bring us (literal) light in the darkest months of the year.


